


Every farm in rock country has that one field. It chews up sickle sections, slows the drill, and sends a crew back out every spring. But “rocky” is a feeling. It doesn’t tell you how bad the problem is or where to start.
This guide gives you a yardstick for a rocky field. It covers why some ground keeps growing rocks, how soil scientists measure stoniness, and how to read rock density on a TerraClear Rock Map so you pick the worst ground first.
Key takeaways
- A rocky field is one where rocks cost you repairs, field time, or crew days. Where the rocks sit and how big they are matter more than the total count.
- Soil surveys class stoniness by spacing. Stones 26 to 82 feet apart barely get in the way. Stones 3 to 26 feet apart cause “some interference.”
- Rocks are rarely spread evenly. Most fields have a few dense zones and a lot of light ground.
- On a TerraClear Rock Map, each detected rock gets its own GPS pin. Where the pins bunch up, density is high.
- Pick the biggest rocks first, then the densest zones, then the rest.
How do you know if your field is too rocky?
If rocks are breaking equipment, slowing field work, or eating up crew days each spring, the field is too rocky to ignore. The total number of rocks matters less than their size and where they sit.
Watch for these signs:
- Header damage at harvest, especially in pulses and small grains, where the cutter bar runs close to the ground
- Broken shanks, bent points, and extra wear on drills and tillage tools
- Slower passes because operators are watching for rocks instead of the job
- Crews driving the whole field to find rocks and still missing some
- New rocks showing up in ground you picked clean last year
That last sign isn’t your imagination. The next section explains why.
Why are some fields rockier than others?
Most rocks in Prairie fields came from glaciers, and freezing and thawing pull new ones to the surface every year.
The Minnesota Geological Survey describes glacial till as a mix of clay, silt, sand, gravel, and boulders that the ice dropped where it melted. Just south of the border in North Dakota, glacial deposits average 150 to 250 feet thick across the northern and eastern part of the state, and boulders occur through that whole depth, according to the North Dakota Geological Survey. Most of those rocks started out in Canada, carried by the same ice sheets that covered the Prairies. The supply under your field is deep.
Frost heave brings that supply up. Soil freezes from the top down. Water moves toward the freezing layer and forms ice lenses that lift the soil, and frozen soil grips rocks and lifts them with it. A typical North Dakota winter freezes the ground about 4.5 feet deep, per a North Dakota Geological Survey report on frost heave. Over many freeze-thaw cycles, rocks work their way up. That’s why the same survey notes that farmers remove a new crop of stones every spring.
Rockiness also changes from field to field. Till varies across short distances, and the North Dakota Geological Survey notes that boulders pile up where waves once washed away finer soil, such as the old shorelines of glacial Lake Agassiz. If you’re weighing fall versus spring mapping, our guide to fall stone picking covers how frost heave affects timing.
How many rocks per acre is normal?
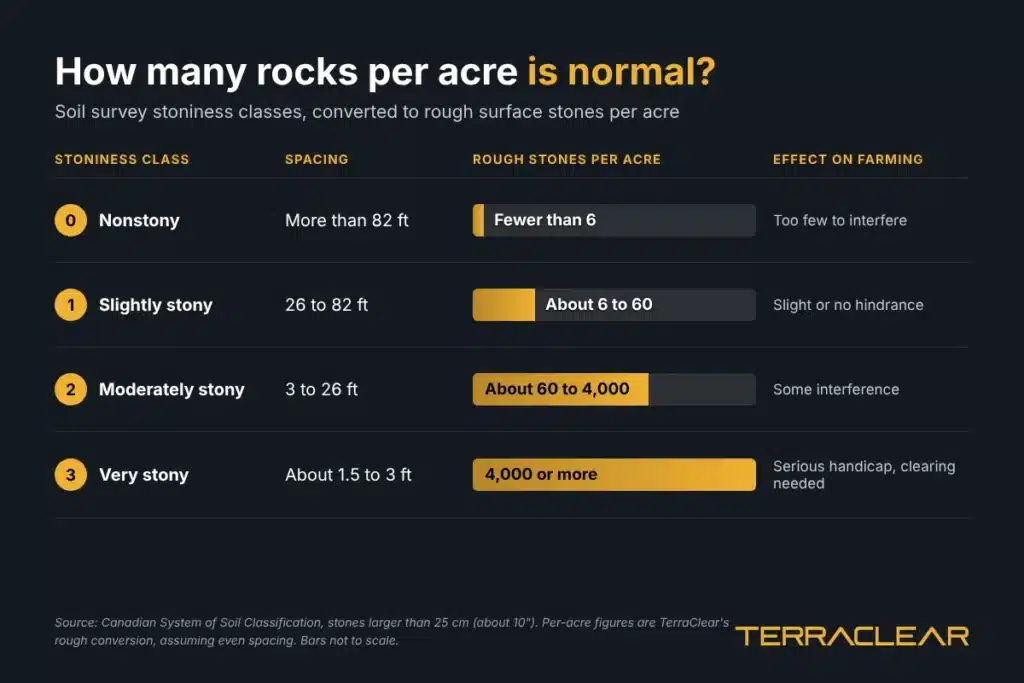
No official number defines a normal field. Soil scientists do class stoniness by how far apart surface stones sit. Converted to acres, a slightly stony field has roughly 6 to 60 surface stones per acre. A moderately stony field has anywhere from about 60 to 4,000.
The classes below come from the Canadian System of Soil Classification, which counts stones larger than 25 centimeters, or about 10”. The per-acre column is our conversion.
| Stoniness class | Spacing between stones | Surface covered | Rough stones per acre | Effect on farming |
|---|---|---|---|---|
| 0, nonstony | More than 82 feet | Under 0.01% | Fewer than 6 | Too few to interfere |
| 1, slightly stony | 26 to 82 feet | 0.01% to 0.1% | About 6 to 60 | Slight or no hindrance |
| 2, moderately stony | 3 to 26 feet | 0.1% to 3% | About 60 to 4,000 | Some interference |
| 3, very stony | About 1.5 to 3 feet | 3% to 15% | 4,000 or more | Serious handicap, some clearing needed |
| 4 and 5 | Under 1.5 feet | More than 15% | Not farmable without major clearing | Prevents cultivation |
How we did the math: an acre is 4,047 square meters. We assumed stones sit on an even grid at each class’s spacing and divided. Real fields are never that even, and that’s the point of the next section.
By those definitions, a field you crop every year without major clearing falls in class 0, 1, or 2. Class 2 is a huge range, though. Two fields can both be “moderately stony” and differ by a factor of 50. A field average also hides where the rocks really are.
Size matters too. The USDA NRCS Soil Survey Manual calls rocks from 3” to 10” cobbles, 10” to 24” stones, and anything bigger boulders. Rocks under the 10” survey cutoff can still catch a header, so a useful map has to show both count and size.
What does rock density look like on a TerraClear Rock Map?
Each rock the map detects gets its own pin at a GPS-pinpointed location, color-coded by size. Density is easy to see: it’s where the pins bunch up.
A TerraClear Rock Map covers the whole field, not a sample, and it’s delivered the next day on average after the flight. In the app, you can tap a pin to see a photo of that stone, filter by size, and mark rocks as picked.
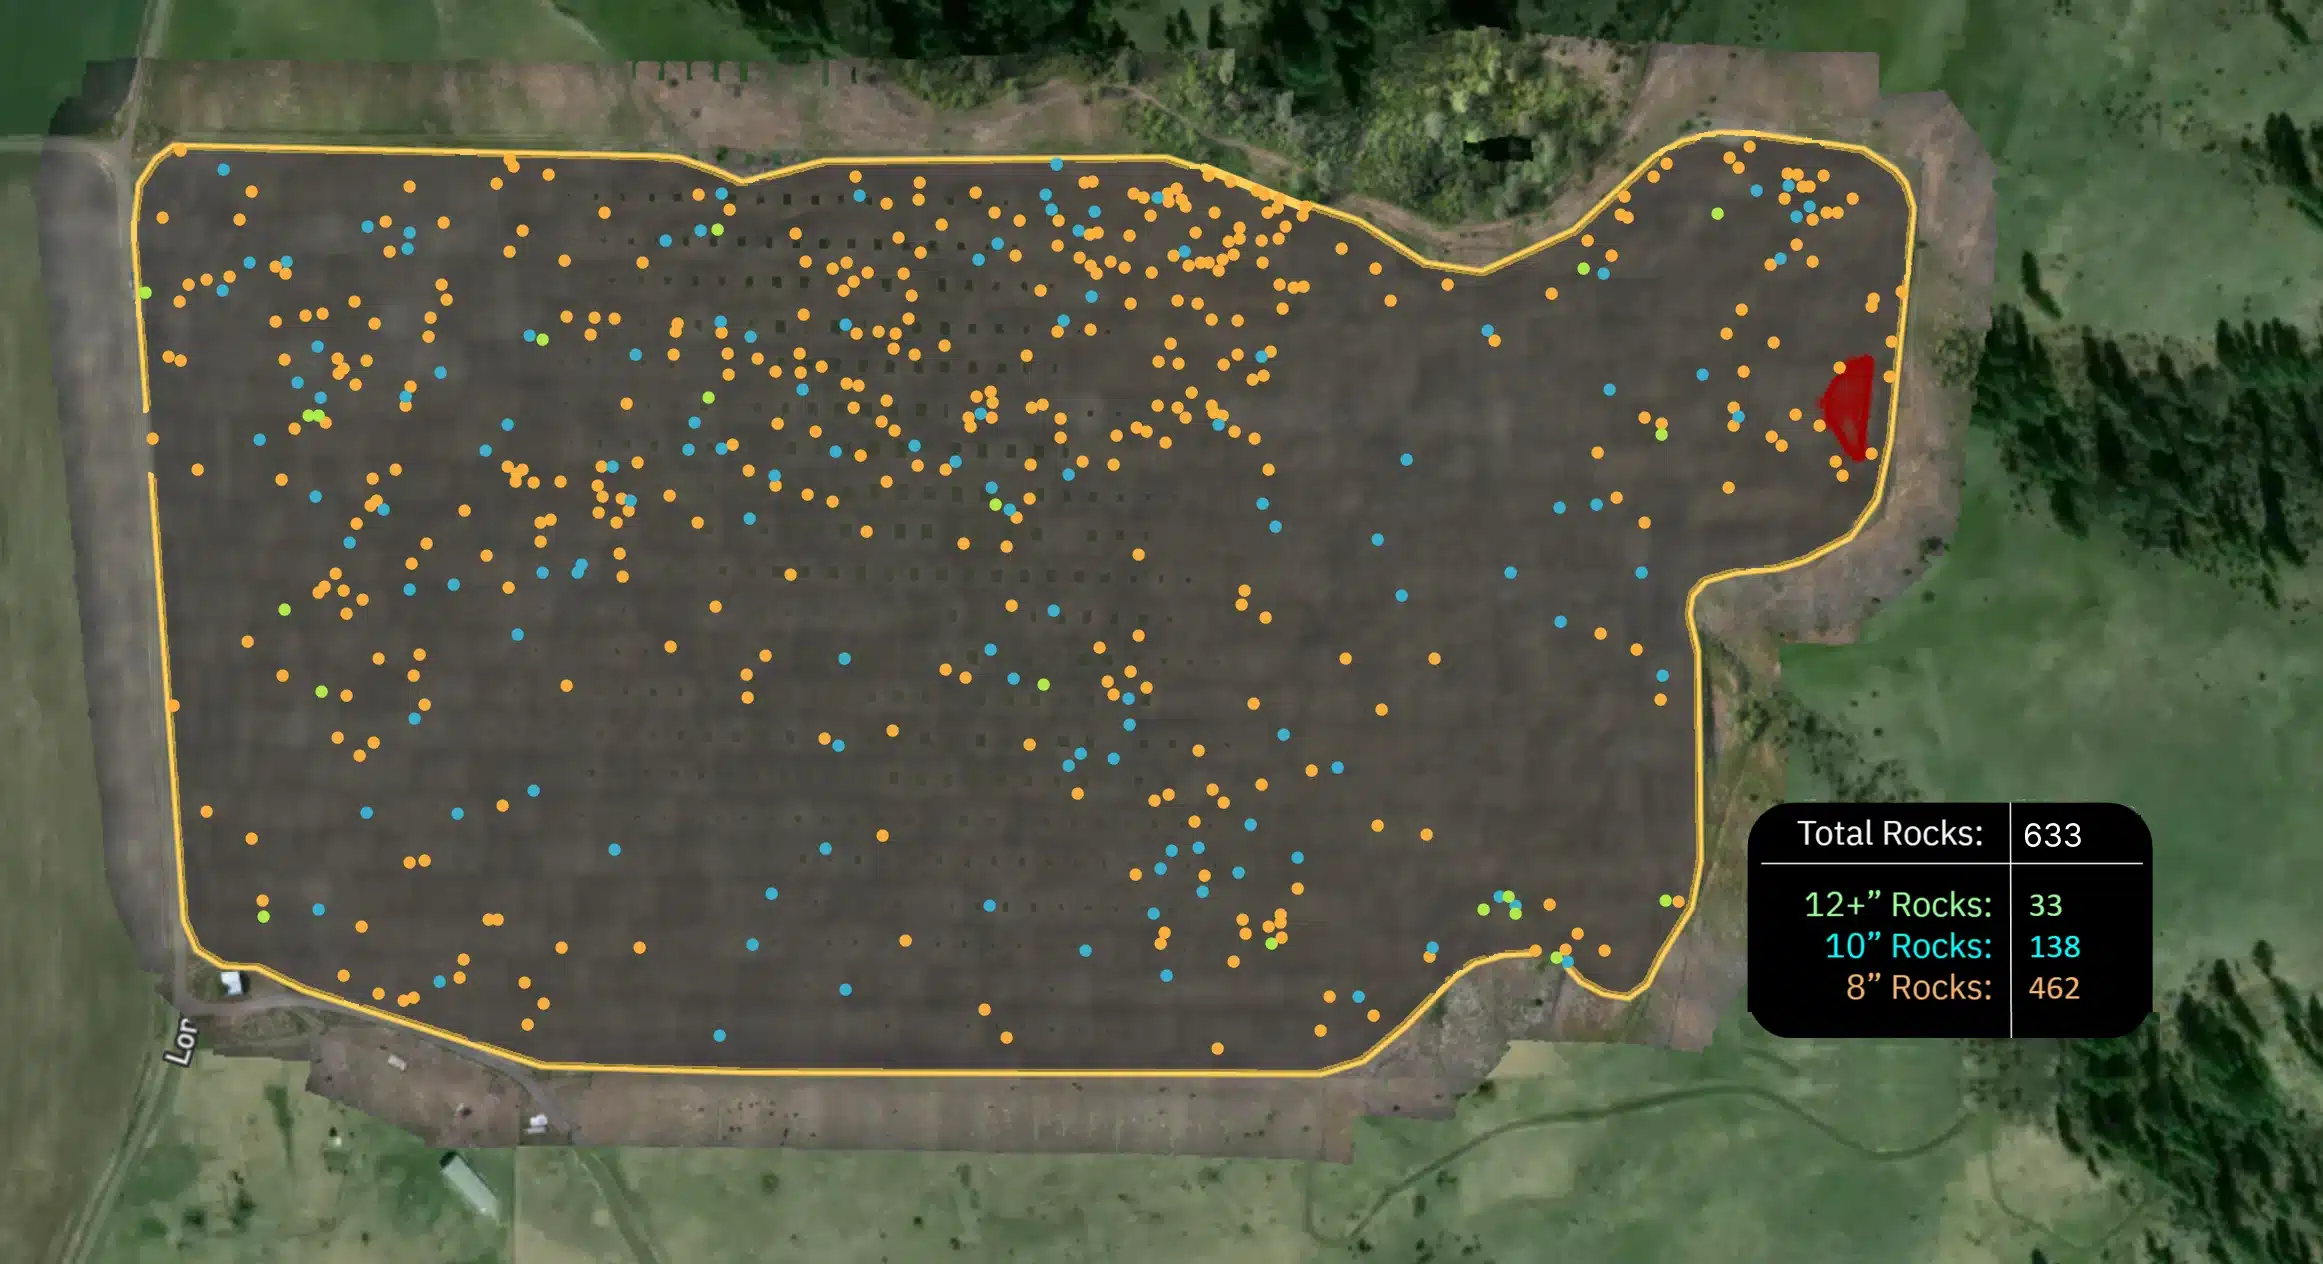
Take the field in the featured image above. The map found 633 rocks 8” and larger:
| Rock size | Count |
|---|---|
| 12” and up | 33 |
| 10” | 138 |
| 8” | 462 |
Read it the way you’d read a yield map. Pins pack tight along the north edge and in the northeast corner. The west side has scattered clusters. Large stretches of the south and east are light. The biggest rocks, the 33 that measure 12” and up, are only about 5% of the total.
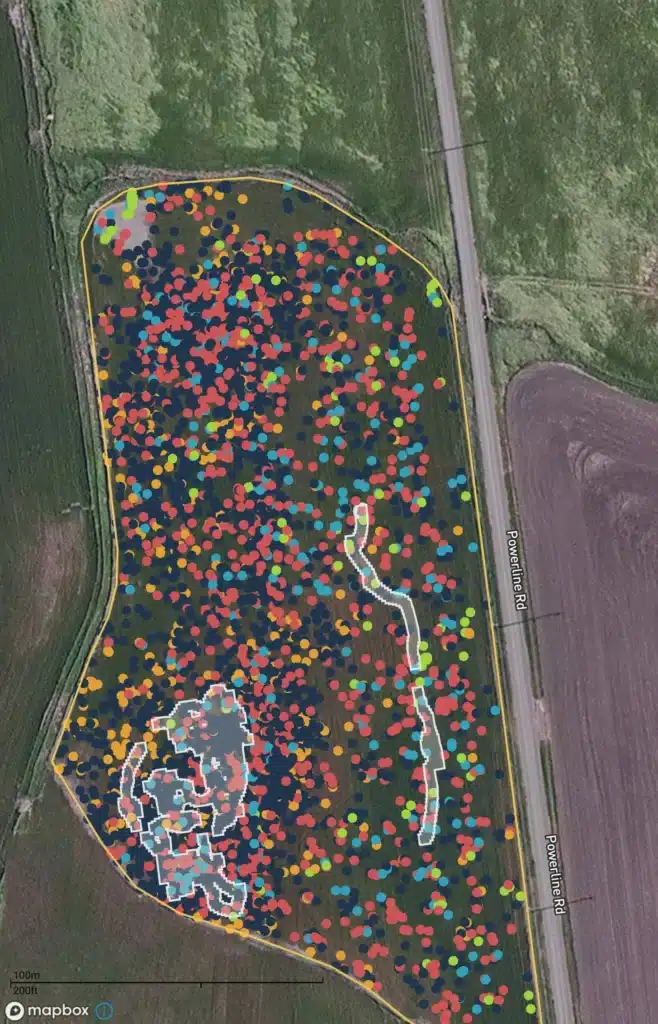
The second field is a different story. Pins cover nearly every part of it. The white outlines show ground the crew has already covered, so anyone in the operation can see what’s done and what’s left.
How do you decide where to pick first?
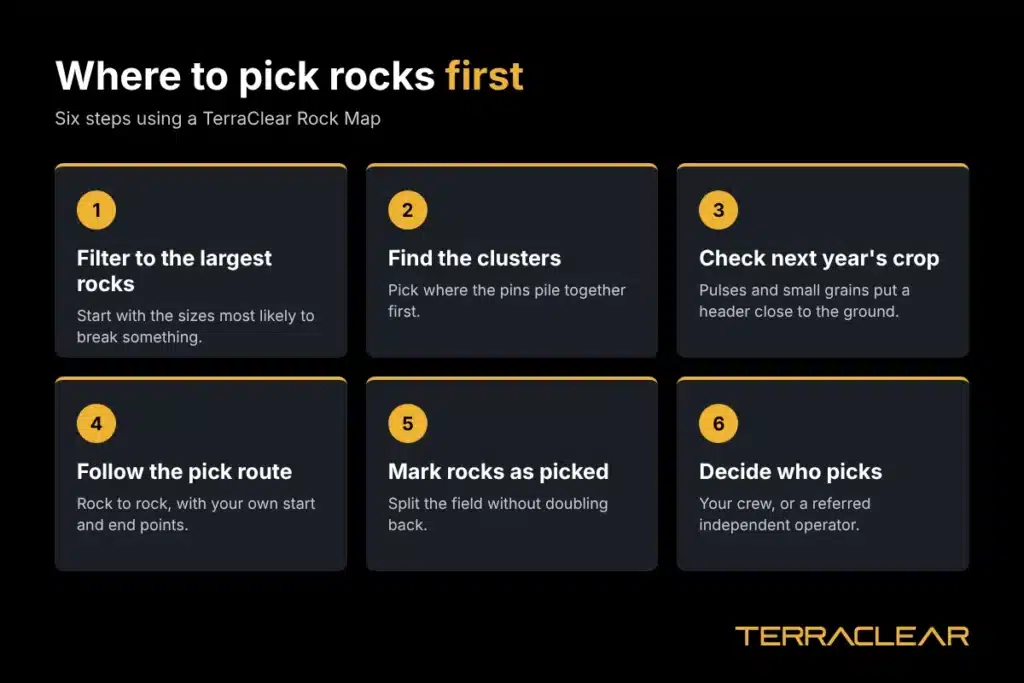
Start with the biggest rocks, then the densest zones, then the light ground. Plan around what crop goes in next.
- Filter to the largest rocks. In the example field, showing only 10” rocks and up drops the list from 633 pins to 171. Those are the rocks most likely to break something.
- Find the clusters. Zoom out and look for where pins pile together. A crew picks more rocks per mile driven in those zones.
- Check next year’s crop. Fields going to pulses or small grains put a header close to the ground. University of Minnesota Extension advises being selective about rolling and focusing on fields where rocks are a known harvest risk. The same logic works for picking.
- Follow the pick route. The app routes your crew from one rock to the next, and you can set the start and end points.
- Mark rocks as picked. The app tracks the ground covered and the stones marked picked, so crew members can split a field without doubling back.
- Decide who picks. Your own crew can do it, or TerraClear can refer you to an independent rock picking operator.
Don’t work the ground between the flight and picking. Tillage moves rocks around, so the pins stop matching what’s in the field.
For a closer look at positioning, see our guide to GPS for stone picking.
Does a lightly rocky field still need a map?
Often, yes. In a light field, most of the time spent picking without a map goes to driving empty ground. A map sends the crew to the rocks and skips the rest.
Light fields also hide the rocks that hurt most. A single 12” rock sitting alone in a clean stretch is easy to miss by eye and hard on a header.
Farmers who pick from a TerraClear Rock Map find about 3x more rocks than they did picking by eye, and they pick about 3x faster. Jacob Ebeling’s crew in Minnesota went from nine people to one. Two weeks of work got done in one.
“A 273-acre field would normally take six to seven hours with a tractor. Using the map, I was able to pick it in just an hour and a half with the side-by-side.” Jordan Schmidt, Saskatchewan farmer
When should you map a rocky field?
Map when rocks are visible from the air: bare soil, residue, stubble, or early emergence. Heavy residue can hide smaller rocks, so fly after residue settles or before spring seeding.
You can order TerraClear Rock Maps in the app or learn more about TerraClear rock management. For current pricing and seasonal offers, visit TerraClearInc.ca/SaveNow. To talk through your fields with a rep, use the form at the bottom of this page.
There’s no single cutoff. Soil surveys say stones 26 to 82 feet apart, roughly 6 to 60 per acre, barely hinder farming, and closer spacing starts to interfere. In practice, a field has too many rocks when they cost you repairs, field time, or crew days.
Bigger rocks do more damage, but any rock that reaches header or drill height can cause trouble. That’s why it helps to filter a Rock Map by size and pick the largest class first.
Frost heave. Soil freezes from the top down, ice lenses lift the soil, and frozen soil lifts rocks with it. Over many winters, rocks from deep glacial deposits work up into the plow layer.
Rocks show up best on bare soil, light residue, stubble, or early emergence. Heavy residue can hide smaller rocks, so time the flight after residue settles or before spring seeding.
Both work, but a fall map won’t show rocks that frost heave brings up over the winter. Read our fall stone picking guide for the tradeoffs.
Yes. Each pin is color-coded by size class, and you can filter the map to show only the sizes you want to pick.